
Introduction to Docker
Issue: An app works on Wilma’s laptop but does not work on Fred’s laptop because they have different operating systems (OS)
Fix: Docker – isolates application and dependencies (libraries, run time, etc.) into an image → image runs identically anywhere
When to use? Single machines or local development; Building, testing
Containerization – method of OS-level virtualization where an application and all its dependencies (binaries, libraries, runtime configs) are put into a self-contained, portable unit called a container
Unlike heavy VMs, containers share the host machine’s OS kernel rather than booting an entire guest OS making them boot in seconds and consume fewer system resources
Applications are packaged into immutable Docker Images → Images can be run locally/single host as a Docker Container
Terms:
- Dockerfile: text file with steps on how to build the environment
- Defines base image (ex. node.js/python) + sets commands for the container to run
- Docker Image: read-only blueprint from the dockerfile
- Result of the dockerfile = image has everything to run the application
- Pushed to a Container registry (ex. Docker Hub, Google Container Registry)
- Docker Container: live, running instance of an image sharing the host OS kernel
- Docker Compose: tools that lets you run multi-container applications locally using 1 YAML configuration
Docker image consists of many layers. The reason it is small is because a single layer gets modified . Next time you want to pull an updated image, all you’re pulling is the single layer that got updated.
Docker Image layers
- Build the layer
A docker image is built as a stack of filesystem layers. When you run a container, the Docker layers are stacked using a Union File System (UnionFS / Overlay2). The application looks like a single filesystem with a writable layer on top.
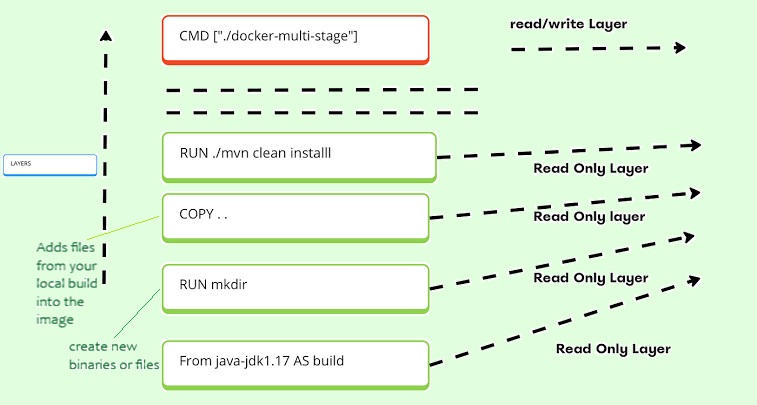
Certain instructions create a physical layer on disk:
FROM: Initializes the base OS or parent image layers
COPY / ADD: Adds files from your local build context or remote URLs into the image
RUN: Executes commands (ex. apt-get install or compiling code) that create new binaries or files; generates a new layer
LABEL maintainer="dev@example.com" version="1.0"  #attached metadata to an image

ENV APP_ENV=production #sets the environment variables inside the image

PORT=8000 #application in container listens to port 8000

WORKDIR /app # sets the working directory for any RUN, CMD, ENTRYPOINT, COPY, or ADD instructions

USER appuser #specifies user who runs container

EXPOSE 8000 #listen to this port

ENTRYPOINT ["uvicorn"] #first command to be executed when the container starts

CMD ["main:app", "--host", "0.0.0.0", "--port", "8000"] #default args for the ENTRYPOINT command;
LABEL – maintainer indicates who is responsible for the image, version specific which version
ENV – APP_ENV set to production to configure applications for a production environ, PORT set to 8000 telling the port the application listens to
WORKDIR – commands will be executed in the /app directory inside the container
USER – username/UID to use when running the container; appuser is a non-root user = security best practice
EXPOSE – container listens on network port 8000 at runtime
ENTRYPOINT – uvicorn = fast ASGI server used for Python web applications
CMD – uvicorn runs on app object from the main module, bind to all network interfaces (0.0.0.0), listen on port 8000
Note: Good practice to have the port specified match the configures port listening on CMD/ENTRYPOINT. If the app listens on port 9000 but you expose 8000, someone will map host port 80 to container port 8000 and not see their application as reachable
- Hash is given to the layer, locked in as read-only
What if a RUN command deletes a file in an earlier layer (ex. RUN rm /large-data-set.tar.gz)? The file is not erased from disk, a new layer marks the file with a whiteout file hiding it.
The Container Layer: Launch a container with docker run
-
Image layers are Read-Only – cannot be modified
-
Docker adds on a Read-Write layer on top (Container Layer)
-
If running container need to modify a file, Copy-on-Write (CoW) storage driver copies file from lower layer into top writable layer
-
Container is destroyed → writable layer is deleted → base image is untouched
-
Layer caching
Docker caches each layer when building the container. If we want to rebuild an image, Docker compares the instructions and source files to the cache.
-
Sequential Invalidation: instructions have not changed → reuse cached layer; once a layer changes, the cache is invalidated and rebuilt from scratch
-
Ordering by Volatility: dependencies that do not change often are placed in the Dockerfile early → frequently changing application code placed closer to the bottom
Bad practice:
FROM python:3.11-slim
WORKDIR /app
COPY . . #reruns expensive package installs on every single typo fix
RUN pip install -r requirements.txt
CMD ["python", "app.py"]
Better:
FROM python:3.11-slim
WORKDIR /app
COPY requirements.txt .  #Copy only dependency manifest (changes rarely)
RUN pip install --no-cache-dir -r requirements.txt #build dependency layer; cached across code edits
COPY . .  #Copy application code (changes frequently) at the very end
CMD ["python", "app.py"]
- Multi-Stage Builds
Everytime you execute RUN → new layer gets generated. Multiple commands inflates the image size which leads us to chaining commands.
Chain commands – Group related actions together with && and clear package caches in the same layer; subsequent commands only run if the first one does
RUN apt-get update && apt-get install -y --no-install-recommends \
    curl \
    git \
 && rm -rf /var/lib/apt/lists/*
Multiple FROM statements can also save resources. Instead of installing the entire compilation tools or build artifacts, only the compiled binary or runtime files are copied into the final layer stack
Works great for single machines, but what about running multiple? What happens when a server crashes? Or when to scale up during traffic spikes? How would I balance network traffic across instances?
Use case where dockers fails: Running docker run -d my-app on a single VM when the physical hypervisor dies. Docker is for isolated instances, it is not aware of other hosts. Who detects the node died? Who restarts the containers elsewhere?
This would be a great segue into a solution, oh gee can I get a drumroll please (make it extra dramatic, the best ones are)…🥁3
Kubernetes
Purpose: take containerized applications and scales them across a distributed cluster of servers; handles scaling (add more containers during traffic surges), self healing (restarting dead containers/replacing failed nodes), load balancing, and zero-downtime rolling updates
Goal: Act as loadbalancer so no single container becomes overloaded by scaling pods
When to use? Want to run multiple containers in production; Production deployments
Terms:
- Pod: smallest deployable unit in Kubernetes, groups 1/more containers into a pod
- Shares the same network and storage = ideal for applications that need to communicate with eachother
- Node: worker machine (VM/bare metal) that runs the pods
- Cluster: collection of control plane machine (API server, scheduler, state storage) and worker nodes
- Deployment: defines the state you want (ex. Keep 5 replicas of the web app running at all times) + manages zero-downtime rolling updates
- Deployment controller: watches the shared state of the cluster through api server → makes changes to move current state to desired state
- Service & Ingress: Handles network discovery, internal routing, external traffic load balancing to dynamic pod IP addresses
Planes:
Two planes make up a cluster. The Data plane (contains nodes and user pods) and the Control plane.
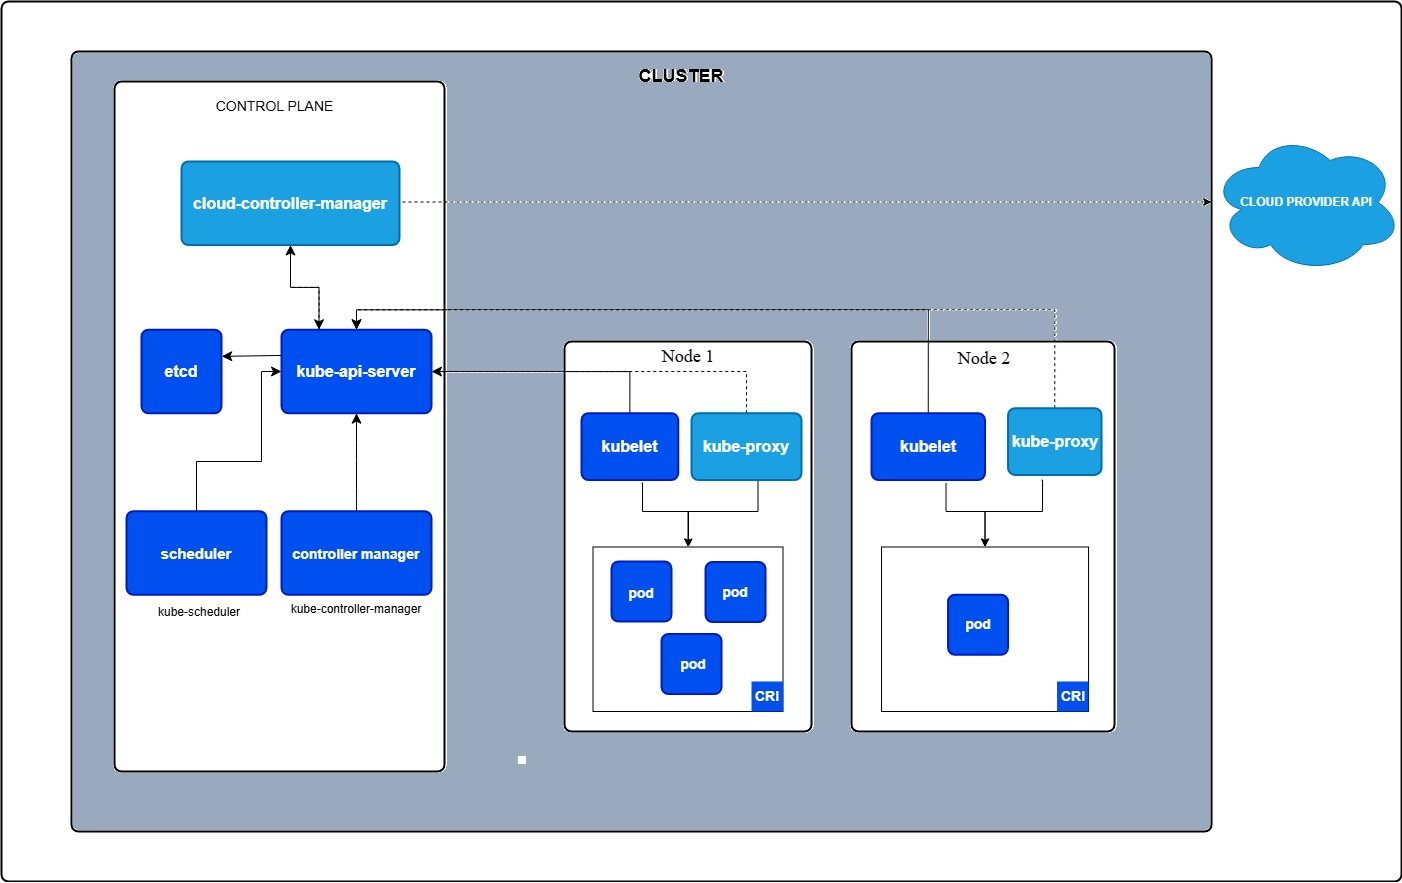
Every worker node runs:
- kubelet: The node’s agent that talks to the Control Plane
- kube-proxy: Manages network rules and packet forwarding
- Container Runtime: The engine (usually containerd or CRI-O) that actually downloads images and runs container processes
How does the Control Plane handle a new request?
run kubectl apply -f deployment.yaml → asking for a pod with 500Mi memory:
- kube-apiserver (Gatekeeper at the front door):
-
Authenticates your credentials, authorizes your permissions (RBAC), validates the YAML, and writes the desired state to etcd (the cluster’s single source of truth key-value database)
-
Pod is created in etcd, but its nodeName field is empty → status: Pending.
- kube-scheduler (The Placement Manager):
-
Constantly watches the API server for newly created pods without an assigned node
-
Filters and scores nodes through a process:
-
Filtering (Predicates): Finds all nodes that meet the pod’s hard requirements:
-
Does the node have enough unallocated CPU and Memory to fulfill the pod’s requests?
-
Any node lacking 500Mi allocatable memory is disqualified
-
-
Scoring (Priorities): Ranks the qualifying nodes to choose the best candidate (e.g., balancing workloads evenly across availability zones or packing nodes efficiently)
-
-
Node selected → scheduler issues a binding request to the API server → updates etcd assigning nodeName: worker-node-2
- kubelet (The On-Node Executor):
- The kubelet daemon running on worker-node-2 constantly watches the API server → notices that a pod has been assigned to its local node → instructs the local container runtime (containerd) to pull the container image → set cgroup memory and CPU limits → start the container → reports back to the API Server: “Pod is now Running.
More info here: https://kubernetes.io/docs/concepts/architecture/
In a modern cloud deployment pipeline:
-
A developer writes application code and a Dockerfile
-
The CI/CD pipeline builds the Docker image → pushes it to a container registry (e.g., Docker Hub, AWS ECR, GCP Artifact Registry)
-
Kubernetes pulls the image from the registry → deploys it as pods across the cluster based on your declarative YAML manifests (traffic is routed to healthy containers, if a container crashes it is restarted)
-
If traffic spikes or a container crashes → Kubernetes scales up or replaces pods automatically to maintain the desired state
Autoscaling in Kubernetes = scale the number of pods based on traffic load
-
Horizontal Pod Autoscaler (HPA) = adding pods – starts new pod replicas to serve additional traffic OR removing pods – demand increases → scales workload down by looking at metrics (HTTP request throughput, message queue size, CPU utilization, memory utilization
-
Vertical Pod Autoscaler (VPA) = makes pods bigger/smaller by adjusting the CPU/memory utilization)
-
Cluster Autoscaler = adds/removes worker nodes to the cluster
Health checks! Yay:
Another benefit to Kubernetes is how it does health checks (through the kubelet - 3 probes)
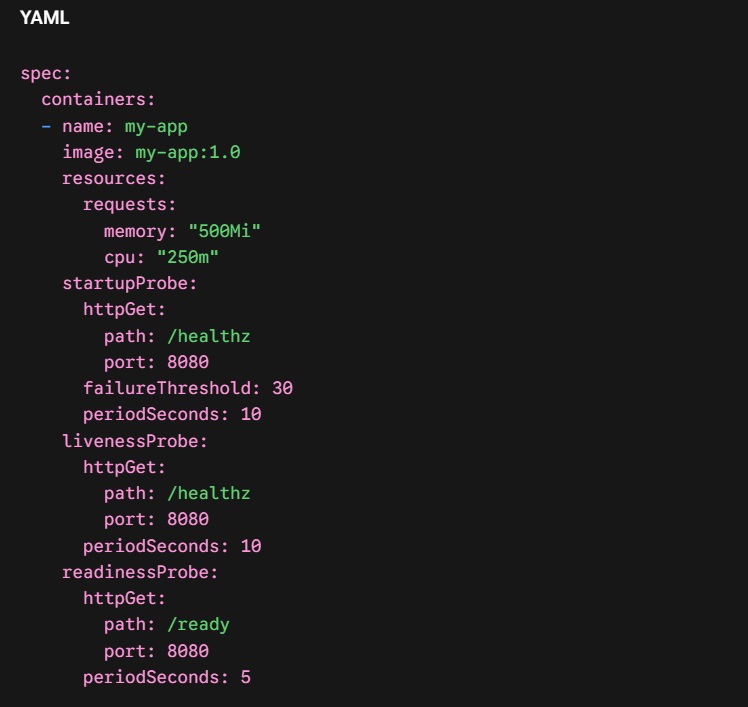
- Startup Probe (The Buffer)
-
Question it answers: “Has the application finished initializing yet?”
-
What it does: Disables the liveness and readiness checks until the startup probe succeeds
-
Why it matters: Heavy applications (ex. Ml runtimes loading weights/apps warming large caches) can take time to boot up. Without a startup probe, an liveness probe may assume the app is dead and kill it in a continuous crash loop.
- Liveness Probe (The Resuscitator)
-
Question it answers: “Is the process healthy, or is it broken/deadlocked beyond recovery?”
-
What it does: Periodically pings the endpoint
-
Failure Action: If it fails past the failureThreshold, the kubelet kills the container → restarts it according to the pod’s restartPolicy
- Readiness Probe (The Traffic Gatekeeper)
-
Question it answers: “Can the application accept user traffic right now?”
-
What it does: Checks if the app is currently able to serve requests (e.g., database connection pool is active, internal queue isn’t overloaded)
-
Failure Action: If it fails, it does NOT restart the container → strips the Pod’s IP address out of the Kubernetes Service endpoints → Traffic routed away to other healthy pods until the probe turns green again
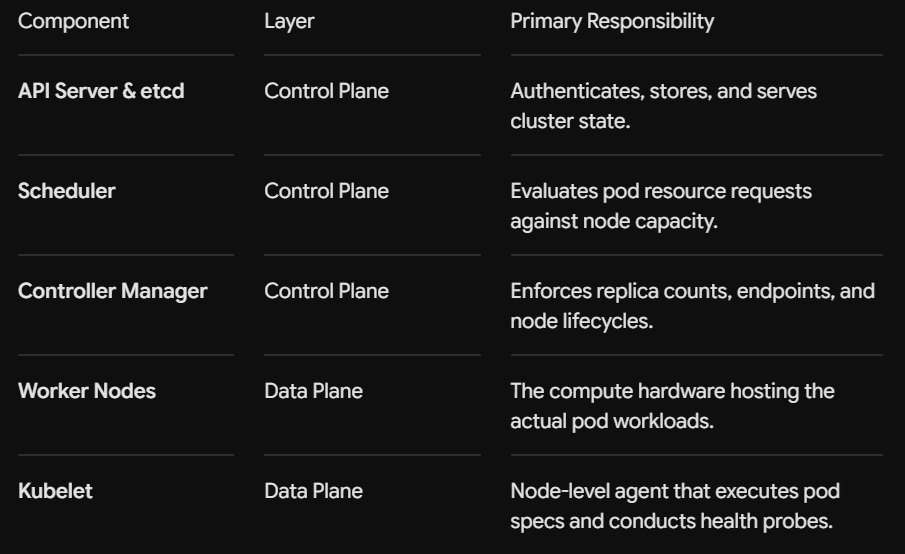
They work hand in hand. Docker holds the applications in lightweight containers, while Kubernetes can manage, scale, and network these containers over a cluster of services.
Use case
Use Case: Production LLM Inference Platform – vLLM or NVIDIA NIMs on Kubernetes
Docker is needed for complex dependencies like specific CUDA drivers, PyTorch versions, and optimized inference engines (TensorRT-LLM, vLLM). Docker packages the entire CUDA runtime and model server into an image (ex. vllm/vllm-openai:latest) which reduces the conflicts between host OS and application code
GPUs are needed:
-
Hardware: Kubernetes uses the NVIDIA GPU Operator to ensure inference pods go to the high-cost GPU nodes.
-
Autoscaling: Standard CPU/memory metrics are useless for LLMs. Kubernetes HPA scales pods on metrics like KV Cache Usage % and the amount of Waiting Requests in queue.
-
Karpenter: GPU instances are expensive. Karpenter clusters GPU nodes when there are user prompts, then kills them when they are not used to reduce cloud waste.
Docker creates the packages and Kubernetes manages the fleet.
Installation
Install Docker from the source: https://docs.docker.com/engine/install/
Windows: Requires WSL 2 (Windows Subsystem for Linux) enabled. Check the “Use WSL 2 instead of Hyper-V” box during installation.
macOS: Choose the installer matching your chip architecture (Apple Silicon arm64 vs. Intel x86_64).
Then check the version:
docker --version
docker compose version
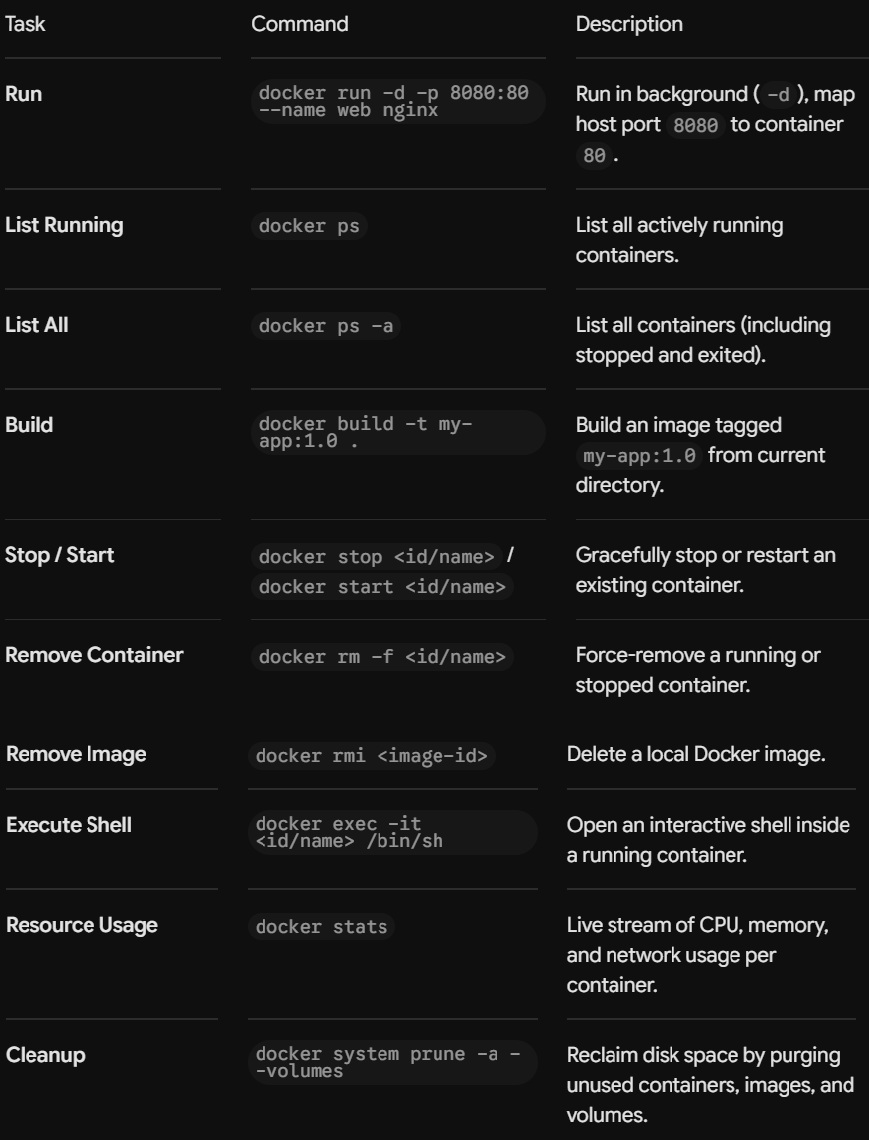
Troubleshooting- Common Docker Problems
(1) Port Conflicts – Bind for 0.0.0.0:<PORT> failed: port is already allocated
Cause: Another container/host process (e.g., local Apache, Nginx, or Postgres) is already bound to that host port
Now: Find the PID or container using the port
docker ps --filter "publish=8080" #check if another Docker container is using the port

sudo lsof -i :8080 #Linux / macOS host: identify the process holding the port
# or
sudo ss -tulpn | grep 8080

Get-Process -Id (Get-NetTCPConnection -LocalPort 8080).OwningProcess #windows (PowerShell):
Fixes:
Kill the host process or stop the container
docker stop <competing-container-name>
sudo kill -9 <PID> # kill host process by PID
(2) Change the host port mapping
docker run -d -p 8081:80 --name web nginx #map a different host port (e.g., 8081) to container port 80
(2) Container Exits Immediately – CrashLoop / Status Exited (1)
Cause: The first process (ENTRYPOINT or CMD) finished executing/hit an uncaught exception/no foreground loop
Now check the logs:
docker ps -a #check the exit code of stopped containers
docker logs <container-id> #check standard output and error streams
Fixes:
docker inspect <container-id> --format='{{.State.ExitCode}}: {{.State.Error}}' #Check out the first command
docker run -it --entrypoint /bin/sh <image-name>  #override entrypoint w/ interactive shell to debug
(3) Inspecting Logs
Container logging maps to the container’s standard output (stdout) and standard error (stderr)
Fix:
docker logs <container-id> #basic log output
docker logs -f <container-id> #follow logs in real time (live stream, like tail -f)
docker logs --tail 50 <container-id> #view only the last 50 lines
docker logs -t <container-id> ##view logs with timestamps
docker logs --since 30m <container-id> #view logs from the past 30 minutes
docker logs -f -t --tail 100 <container-id> #combine flags: follow last 100 lines with timestamps
(4) Disk Space Exhaustion – “No space left on device”
Cause: Dangling images, stopped build cache layers, or volumes accumulate over time
Now:
docker system df #view Docker disk consumption breakdown
Fix:
docker system prune #safely delete unused containers, dangling images, and build cache
docker system prune -a --volumes #deep clean: remove ALL unused images + volumes
(5) Container Cannot Connect to Host Services (localhost Confusion)
Cause: Inside a container → localhost (or 127.0.0.1) = container’s network, not the host machine running Docker
Fix:
-
macOS / Windows: Use the special internal DNS name host.docker.internal instead of localhost
-
Linux: Add —add-host=host.docker.internal:host-gateway to your docker run command, or use user-defined Docker networks (docker network create my-net) to connect multi-container setups by service name
Thank you for reading!